If you love coffee shop-style drinks but have never used an espresso machine yourself, these large specialty coffee makers can be quite intimidating. The best espresso machines often have tons of buttons, knobs, and spouts, and it can seem overwhelming to figure out how to program them, especially if you’re a beginner. While it may look intimidating at first glance, the new Philips Barista Brew Semi-Automatic Espresso Machine is designed to be a beginner-friendly model that makes it practically effortless to pull a perfect shot of espresso.
It takes care of all the tricky aspects—such as grinding the beans, optimizing pressure, and setting just the right extraction temperature—to make it easy for all skill levels to craft delicious espresso drinks at home. I’m a huge fan of lattes but have struggled with cheap coffee makers in the past, so I was curious to see if the Philips Barista Brew could help me perfect my favorite drinks at home. I tested the new espresso machine for a few weeks, and while it does pull a delicious shot, it took me a while to get used to its steaming wand.

Philips Barista Brew: Price and availability Philips has created a range of superautomatic espresso machines, including its Philips 3200 Series Fully Automatic , but this is its first foray into the semi automatic scene. The Philips Barista Brew Semi-Automatic Espresso Machine retails for $649.99 at Amazon and comes in four color options.
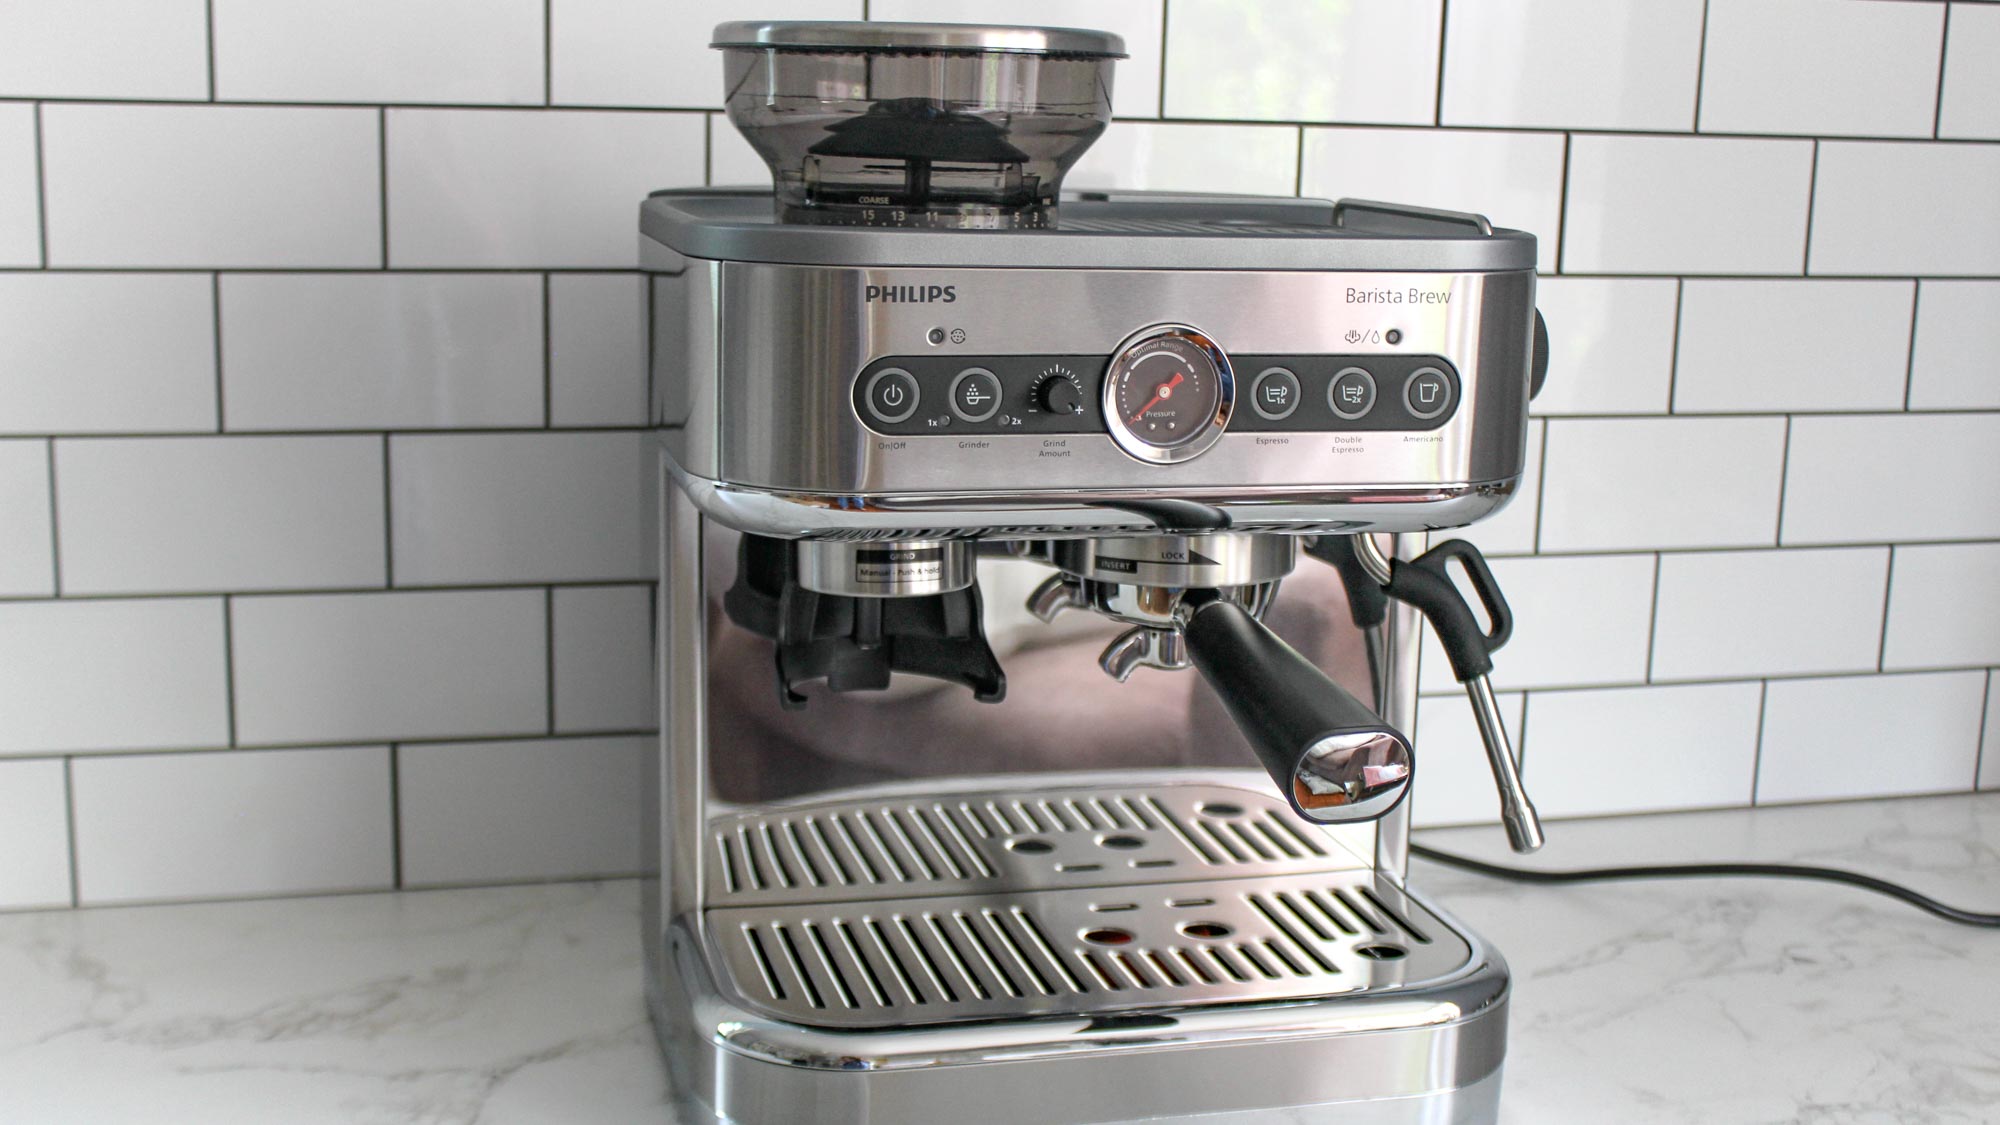
Philips Barista Brew: Design The Barista Brew is a mid-size espresso machine — it takes up a little more counter space than a regular coffee maker, but not so much that it’s obtrusive. The exterior of the machine is a brushed stainless steel that resists fingerprints, which helps keep it blemish-free, and it has a large water tank in the back that can hold around 78 ounces. I often made five or six drinks before needing to refill the tank.
When you do need to top it off, there’s a handle that makes the tank easy to lift, though it can be a bit awkward to put back into place when it’s full. The control panel is located across the top of the machine. In addition to the power button, there’s a button that controls the grinder, a knob that adjusts the grind amount, as well as designated buttons to make a single espresso, double espresso, or Americano.
There’s another large knob on the right side of the machine that controls the milk frothing wand and can be used to dispense hot water, and the bean hopper on top of the machine can be twisted to adjust the grind size to 15 different settings. The portafilter is an impressive 58mm, compared to the Breville Barista Express's 54mm. As coffee enthusiasts tend to favor the wider size, this will be a welcome inclusion from Philips, as will the included dosing funnel, which will prevent spills by directing grounds directly into your filter.
The Barista Brew also comes with a good number of accessories. In addition to the portafilter, there are four filter baskets, including single- and dual-wall options for both single and double shots. While dual-wall baskets are better for beginners, as they help achieve optimal pressure and create crema on your espresso, experienced brewers may prefer a single-wall filter as this can give you more granular control over the extraction, taste, and consistency of your shot.
The machine also comes with several other tools for making espresso drinks, including a heavy-duty tamp, a powder ring that funnels the fresh grinds into the filter basket, a milk jug with a built-in temperature gauge, and several cleaning tools. There’s also a small plastic espresso stand, designed to elevate smaller glasses underneath the portafilter. Philips Barista Brew: Performance For the first use, I followed the instructions step-by-step to pull a single shot.
The directions are thorough and easy to follow, with lots of helpful tips sprinkled in, but the images that go along with the instructions are located in the back of the manual — not alongside the steps themselves. This led to a lot of flipping back and forth while I was getting acquainted with the machine, which was slightly inconvenient. I inserted the portafilter underneath the grinder, then pressed the grind button to dispense freshly ground beans.
From there, it was just a matter of tamping down the grinds, inserting the portafilter into the machine, and pressing start. Grinding Although this machine does have a conical burr grinder, there are 15 grind settings to choose from where more advanced brewers such as the Breville Barista Touch Impress offer closer to 30. Grinding is a bit on the noisy side, with a more high-pitched whining compare to the low humming you might expect from a luxurious grinder.
However, the included funnel allows you to neatly even out your grounds without spilling, and the SS calibrated tamper brings your puck to an evenly weighted consistency. Espresso The machine heated up water quickly, and in less than a minute, it dispensed espresso into my waiting cup. One good feature with this machine is its pre-infusion, which is the key to extracting the most from any shot of espresso.
I monitored the pressure gauge while it was brewing, and the little arrow was right in the middle of the “optimal pressure” range without too much effort. All-in-all, the process was straightforward and not nearly as complicated as some of the other espresso machines on the market, which can take a lot of trial and error. As long as you follow the directions, I think it’s accessible for total beginners.
For those who like to customize their espresso, there are a few other features that you can adjust on this machine. You’re able to change the drink volume, temperature, and water hardness, but the process for doing so is somewhat complicated, so you’ll likely need the manual handy to make these adjustments. Another great feature is the americano setting, which can make a longer black coffee without having to use your steam wand to dispense hot milk into your espresso, making this machine more versatile than many of the semi-automatic espresso machines on the market.
Milk steaming Lattes are my go-to order at coffee shops, so I was also excited to try out the unit’s milk frothing wand. I like that it has a rubber handle that makes it easy to adjust, even if the wand is hot. All you have to do is turn the knob to start the frother, but it takes around 10 to 20 seconds before it actually starts steaming, which is a slower pre-heat time than the likes of the Breville Barista Express Impress and the De'Longhi La Specialista Maestro .
This is also quite a noisy machine, and when the steam wand did come to temperature, it made a loud screeching sound. Once inserted into my milk, the screeching noise continued until I was able to hit the right angle in my milk. You should aim for a noise that sounds a bit like paper being torn, so if your machine is making too much noise, you might need to brush up on some milk steaming tips! The machine brought my milk up to temperature quite fast and I enjoyed that the milk jug has a temperature gauge that changes color to let you know when the milk is at just the right temperature.
There's a learning curve to using machines like this, as opposed so Philips' existing range of superautomatic machines which steam and dispense the milk for you, so for my first few attempts my milk didn’t froth as much as I was expecting. The steamer is a little fiddlier than some of the machines I've tried in the past, but the temperature gauge on the milk jug did help me determine when I needed to stop to prevent my milk from burning. Over the next few weeks, I continued to use the Barista Brew to make different espresso drinks.
I quickly got the hang of pulling shots of espresso, and once I perfected the 45-degree angle of my milk jug and steam wand, I was able to make some great lattes, too. If you are a beginner though, you should be prepared for some trial and error to get the consistency you're looking for with your milk, and you may be better off with something like Ninja's new Luxe Cafe Premier espresso machine which can steam milk totally hands-free if you want the option of fuss-free milky drinks. How does the Philips Barista Brew compare? One of the most comparable machines to the Philips Barista Brew is the Breville Barista Express , which has many of the same features and retails for $699.
99. Just like the Barista Brew, the Breville grinds fresh beans for you and can pull single or double shots, and it has a built-in milk frothing wand that proved to be more effective than the Barista Brew’s. However, the Breville has a shinier stainless steel exterior that will likely feel more sturdy, but also smudges more easily, and it doesn’t have a designated button for Americanos.
If you want a truly hands-off espresso machine, you might want to splurge on the Philips 3200 Series Fully Automatic Espresso Machine , which costs $799. With one press of a button, this machine is able to grind beans, pull a shot (or two), and froth milk, dispensing a delicious latte or cappuccino right into your waiting mug. It can also make regular coffee and Americanos, though we thought the coffee was slightly weak in our testing.
Should you buy the Philips Barista Brew? The Philips Barista Brew Semi-Automatic Espresso Machine has some stiff competition in the semi automatic space. On one hand, the machine makes it easy to pull rich, flavorful shots of espresso, even if you’re a beginner, but it also allows ample customization for those who want more granular control over their drinks. The unit also has features like a built-in grinder and calibrated tamper that take a lot of the hard parts out of making espresso, and the added extras such as the coffee funnel and temperature-sensitive milk jug allow it to stand out from the crowd.
However, if you've started on the path to being a coffee fanatic, you may find yourself upgrading to a separate coffee grinder over time, as the 15 ground settings could feel limiting for serious espresso fanatics..